How to Open SVG Files in the Cricut Design Space App

Learn How to Upload SVG Files to the Cricut Design Space App on iPad + iPhone
One of the awesome things about Cricut machines is the ability to use the Design Space mobile app to edit and cut SVG designs from your iPad or even iPhone without being tied down to a computer!
In this tutorial, you will learn how to open SVG files in the Cricut Design Space app using your iOS device.
In this example, I’m using an iPad, but the steps are exactly the same for iPhones – just on a smaller screen.
Video Tutorial
If you prefer written step by step instructions instead of video, continue reading.
First Thing’s First – Unzip Those SVGs!
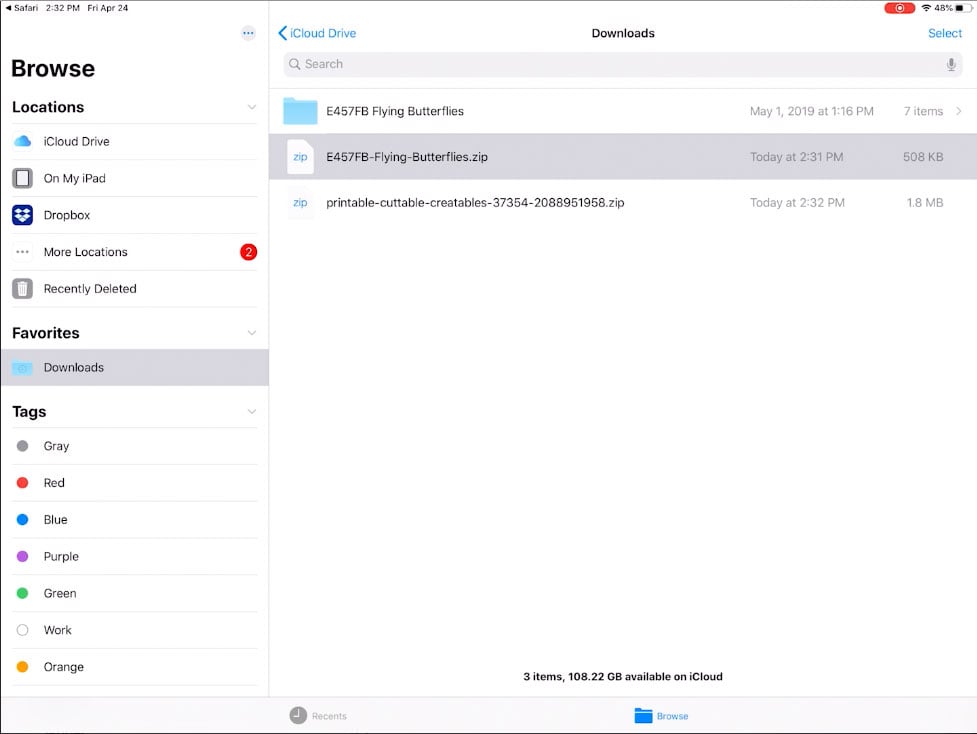
When downloading Cricut SVG files from most websites, the files will download as a Zip, so before you can upload the SVG to Design Space, you first need to unzip the file. If you’re using iOS 13 or newer, you can unzip files directly in the Files app – without installing a third-party app!
Just tap the zip file and a blue folder will appear above it.

Tap the blue folder to see the files inside, including the SVG files.

If you need more help on how to do this, take a look at my step-by-step tutorial which shows how to download and unzip SVGs on iPhone and iPad, as well as how to find where your downloads are being saved.
Upload SVG Files to the Cricut App
Once you have downloaded and unzipped your SVG files you can open up the Cricut Design Space app.

Make sure you are signed in, and click “New Project”

The Canvas will open. In the row of icons at the bottom left, tap the “Upload” icon.

In the popup menu that appears, tap “Browse Files”.

Click “Browse” and navigate through the Files app to locate where you saved your SVG file. Make sure you are choosing an SVG file – not a zip file.

You’ll then be prompted to give the file a name.

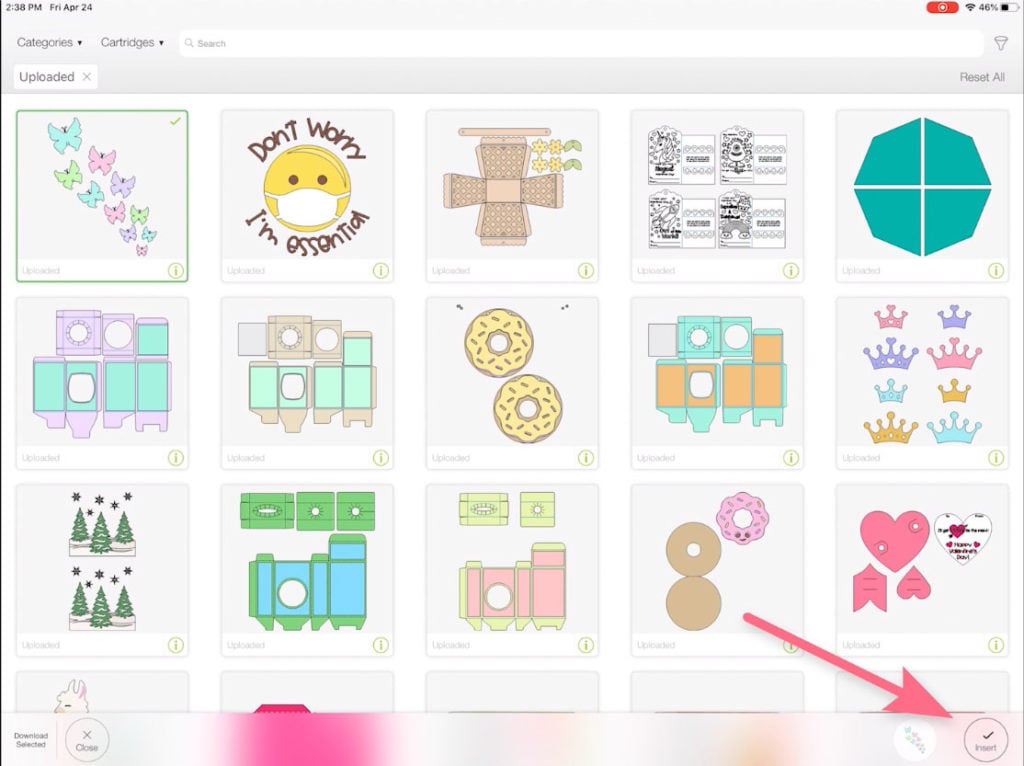
The SVG design will appear at the top of your “Uploaded” images section. If you don’t see it right away, you may need to swipe down on the screen to refresh the page.
Tap the image to select it, then tap the “Insert” button at the bottom right corner of the screen to open the design on your Canvas.

The file will open on your Canvas, but notice that it looks very small. Tap and drag the “Resize” arrow at the bottom right corner of the design to make it bigger.

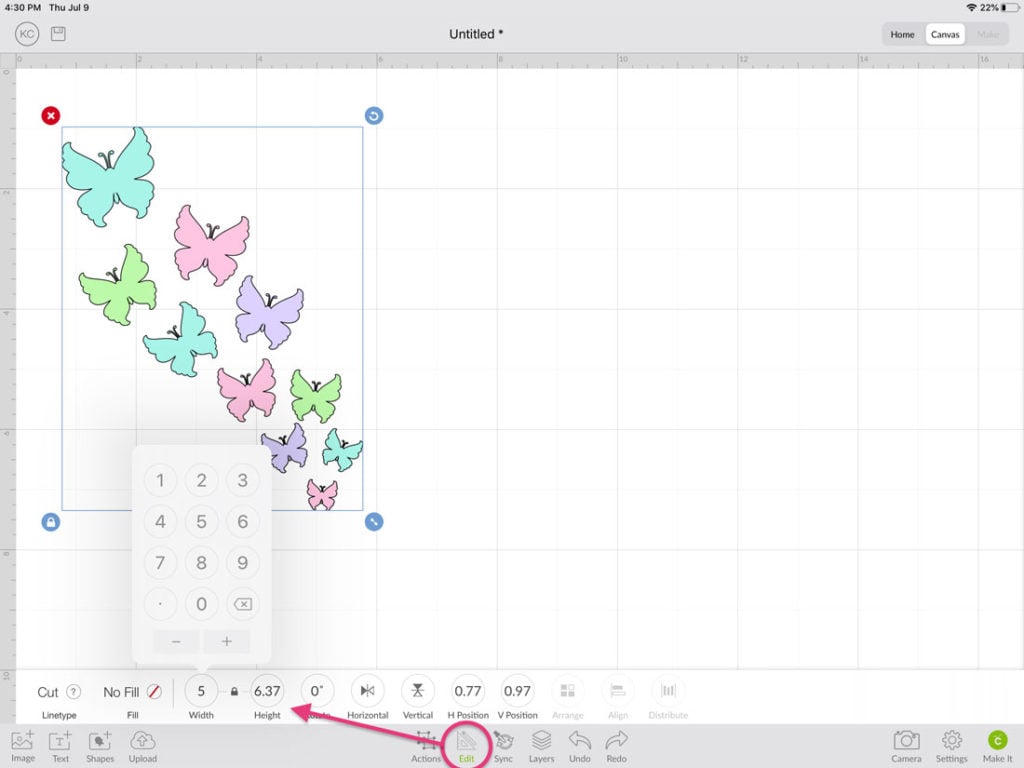
If the file requires specific dimensions, such as a box or 3D project, you can tap the “Edit” icon and type in measurements using the Width and Height fields.

Make sure the padlock icon is “locked” to maintain correct design proportions.

By default, all elements of a design will come grouped together. To work with elements individually, tap “Actions”, then tap “Ungroup”.

Now each group can be moved separately.

You may need to tap “ungroup” again, to separate the groups and be able to work with each shape individually.

If you tap the “Layers” icon, the layers panel will appear on the right side, where it’s easier to see the breakdown of groups and layers.

Now you can make any changes needed, to prepare the design for your project!
I hope this tutorial has helped you learn how to open SVG files to the Cricut Design Space app. If you’re looking for some ready to cut Cricut SVG files, check out my SVG designs (with over 275 Free SVG files!).

Happy Crafting!

Affiliate Disclosure: I may be an affiliate for some products recommended in this post. This means that if you purchase items through my links I will earn a small commission, at no extra cost to you. I only recommend products that I have personally used and enjoy and when you order through my link, it helps me continue to offer you weekly free SVG files, digital papers, scrapbook sketches, tutorials, and other fun things. Thank you in advance for your support!
Let's Keep In Touch!
BLOG CATEGORIES
GET THE MOST FROM SILHOUETTE STUDIO!
CREATABLES
- Laserables (15)
- Freebies (505)
- Doables (161)
- Cards - Envelopes (26)
- Boxes - Bags (35)
- Gift Holders (36)
- Earrings (8)
- 3D (12)
- Treat Holders (44)
- Ready to Make (9)
- Design Elements (1351)
- Sketchables (46)
- Borders / Frames (47)
- Embellishments (846)
- Word Art / Titles (410)
- Digital Paper (Singles) (23)
- Digital Stamps (47)
- Theme Sets (166)
- Sketchable Sets (7)
- Digital Stamp Sets (7)
- Border / Frame Sets (44)
- Embellishment Sets (55)
- Digital Paper Packs (43)
- Alphabet & Number Sets (6)
- Word / Title Sets (19)
- SVG Scrap Kits (8)
- Virtual Wallet (5)
- Commercial Licenses (5)


